How to Open & Close
A simple photo guide to safely opening and closing your ONS pressure cooker.
How to Open
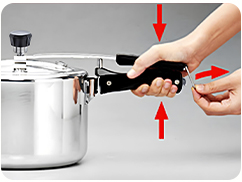
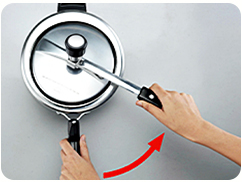
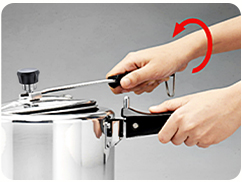
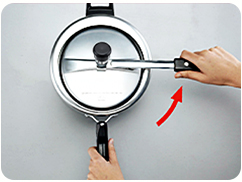
Opening your ONS pressure cooker is a simple sequence. Hold the body firmly, swing the lid handle until it aligns with the body handle to release the lock, then lift the lid clear of the rim. Follow the numbered steps below.
 1
1
 2
2
 3
3
 4
4
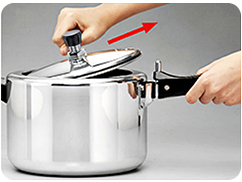 5
5
How to Close
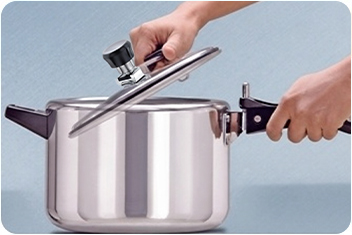
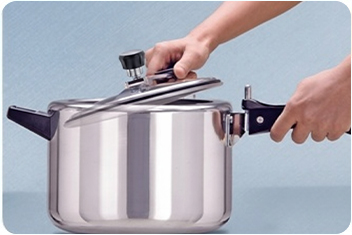
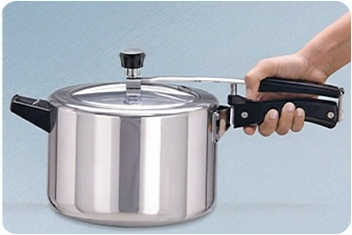
Practice opening and closing your ONS pressure cooker several times before your first use so the motion becomes familiar. To close, lower the lid into the body, centralize it on the rim, then rotate the lid handle back until it latches over the body handle.
The correct way to open and close

Tips to make closing and opening easier
- While closing and opening, do not tilt the lid deeply into the cooker body. The minimum tilt that gets the lid into and out of the cooker body should be used so the lid does not touch the food inside.
- Before latching the handles together, centralize the lid so that the sealing ring is in even contact with the rim of the cooker body.
- When opening after releasing the locking loop, do not let go of the lid handle or the lid will fall into the cooker.
- Squeeze the lid and body handles together at the end away from the cooker body — this requires the least force.
Lowering and latching the lid
Trial Run Before Cooking
Do a test run before using your ONS, even if you have experience with pressure cookers. Over the course of around half an hour, this part will walk you through your trial run step-by-step.
1. Preliminary Steps
Wash the cooker after removing the label, using vegetable or baby oil to remove any glue. Read The Benefits of Pressure Cooking, Important Safeguards, Parts of an ONS Pressure Cooker and Basic Product Information. Decide which pieces. The sealing ring on the lid curls when the pressure regulator is removed and placed on the steam vent. The pressure cooker should be closed and opened several times.
2. Placing Cooker on Stove

Fill the body of the cooker with two cups of water. In order to avoid discoloring the cooker, add 1 teaspoon (5 ml) of lemon juice or vinegar (not for anodized cookers). Take off the steam vent’s pressure regulator. Verify that the steam vent is clear by looking through it.
Examine and fine-tune the sealing ring’s position on the lid curl by firmly pressing it down. The closed cooker. The cooker should be set on high heat.
3. Ensuring a Steam-tight Seal
Hot air and/or steam should only emerge from the steam vent when water boils. Check the lid’s centralization by sliding it slightly in the direction of the steam escape and latching it back in place if steam is leaking around the lid’s edge. Because the lid will be hot, DO NOT touch it with your naked hands.

WRONG: Steam coming out from lid edge

RIGHT: No steam leakage
4. Placing the Pressure Regulator


Press down hard with the pressure regulator on the steam vent after steam is gradually emerging from it. Placing the pressure regulator on the steam vent requires keeping fingers off the steam and on top of the regulator. The location of the pressure regulator is indicated by a click. It should take around two minutes for the cooker to reach its maximum working pressure.
5. How to Recognize Full Operating Pressure
ONS: Upon attaching the pressure regulator to the steam vent, a very faint hissing sound of steam is first produced. After that, the pressure regulator whistles when the steam emission reaches maximum intensity. At this point, the cooker is functioning at full pressure. At this stage, turn down the heat and begin timing the recipe.

THE ONS COOKER WHISTLES AT FULL OPERATING PRESSURE
6. Maintaining Pressure on Reduced Heat
Turn down the heat from HIGH to MEDIUM or below once the pressure reaches full. A pressure of around 15 pounds per square inch (1 kilogram per square centimeter) will be maintained inside the cooker. Further lower the heat if the cooker whistles too often (greater than four whistles per minute).
Increase the heat steadily until steam emerges from the pressure regulator if it hasn’t for a few minutes.
The frequency of whistles may not be affected by changes in heat level for a while, especially when using electric heat. The right heat setting and any necessary modifications will become evident with a little experience.
7. Releasing Pressure
Switch off the heat. Take the pressure cooker off of the burner:
ONS: With a fork, slightly lift pressure regulator to release steam. Do not remove pressure regulator.

Reduce the pressure when cooking as directed by the recipe or on Easy Tips for Better Cooking.
8. Final Steps
Cooker should be opened. Pour away the water. Rinse and dry the pressure regulator, cover, and body. Keep the pressure cooker open while storing it. Prior to cooking in your ONS, read the instruction manual or cookbook that came with your cooker.