Almanac of Pressure Cooker
Everything you need to know about your ONS pressure cooker — on one page.
Almanac of Pressure Cooker
What is Pressure Cooking?
Regular open-pot cooking is carried out at sea level at 100°C (212°F), which is the boiling temperature of water. By confining steam inside a pot, pressure cooking raises the boiling point of water and the cooking temperature through a safe, controlled rise in pressure. Steam permeates food, preserving nutrients, color, texture, and moisture while tenderizing ingredients and drastically cutting cooking time. Using 15 psi (1 kg/cm²), the ONS Pressure Cooker cooks food at 121°C (250°F).
The Benefits of Pressure Cooking
ONS pressure cooking can reduce cooking time by up to half. Tough meats and legumes become tender much faster. With shorter cooking times, fuel consumption is significantly reduced. Pressure cooking also preserves nutrients like proteins and vitamins. Because food is cooked in steam at high temperatures inside a closed environment, it becomes more hygienic and flavorful. You can prepare entire meals or recipe components in the ONS cooker.
Important Safeguards
- Read all instructions before use.
- Do not touch hot surfaces—use handles.
- Keep out of children's reach.
- Do not place the cooker in an oven.
- Do not clean in a dishwasher.
- Use extreme caution when moving a cooker containing hot liquids.
- Use the cooker only as intended.
- Ensure the lid is properly closed before pressure cooking.
- Always check safety valve, vent tube, and weight are unclogged.
- Never place anything on top of the vent weight.
- Place vent weight only after steam flows steadily.
- Add required water amounts based on cooker size.
- Never fill the cooker more than two-thirds full.
- Do not cook frothing foods like applesauce, oatmeal, noodles, etc.
- Reduce heat after full pressure is reached.
- Never force open the cooker; wait for pressure to drop.
- Never lift the vent weight to release pressure for liquid foods.
- Do not use cooker for deep frying or oil pressure cooking.
- Replace safety valve yearly.
- Use only genuine ONS spare parts.
Basic Product Information for ONS Pressure Cookers
Every pressure cooker's listed volume refers to the capacity with the lid closed. The actual usable cooking capacity is smaller. Never fill the cooker beyond two-thirds of its total volume to prevent blockage of the steam vent and ensure proper steam circulation.
Foods that expand—such as rice, lentils, and most liquid dishes—should not exceed half the cooker's capacity. Sprouting dals (like tuvar and moong) should not exceed one-third capacity.
For a 5-liter (5½-quart) ONS cooker:
- Two-thirds full ≈ 13½ cups (3.2 liters)
- Half full ≈ 10 cups (2.4 liters)
- One-third full ≈ 6½ cups (1.6 liters)

CAPACITY FOR SOLID FOODS: TWO-THIRDS FULL

CAPACITY FOR LIQUID OR FROTHING FOODS: HALF FULL
The pressure regulator maintains approximately 15 psi (1 kg/cm²). It must be pressed firmly into place on the steam vent. A faint click confirms proper seating.
Inserting the Pressure Regulator / Vent Weight


A robust spring mechanism keeps the pressure regulator securely attached even when the lid is inverted.

The steam vent nut fastens the steam vent to the underside of the lid. It contains seven holes that allow steam to escape even if some of them become clogged. Always verify the steam vent is clear before each use.
Safety Valve Function
If normal steam release is blocked, the safety valve activates. It also activates when the cooker boils dry due to insufficient water, causing temperatures above the normal safe range.

FUSIBLE ALLOY

WHICH MELTS WHEN REQUIRED
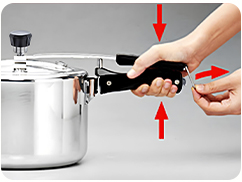
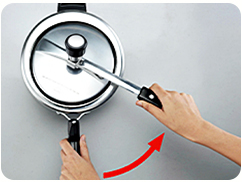
The lid handle bar is designed with intentional "play" or movement. This ensures better sealing between the lid and the cooker body.

MOVEMENT OF ONS LID HANDLE BAR: SIDE VIEW

MOVEMENT OF ONS LID HANDLE BAR: FRONT VIEW
The steam vent also acts as an outlet for excess steam. The lid handle is positioned near the steam vent for secure handling.
The lid includes a removable rubber sealing ring. To remove it, lift it gently from the lid curl using your fingertips. To replace it, slide the sealing ring over the lid handle and press it firmly into the lid curl until seated evenly.


Trial Run Before Cooking
Do a test run before using your ONS, even if you have experience with pressure cookers. This section will walk you through the complete trial run, which takes approximately 30 minutes.
Preliminary Steps
Wash the cooker after removing the label, using vegetable or baby oil to remove any glue. Read "Almanac of Pressure Cooker," "Important Safeguards," "Parts of an ONS Pressure Cooker," and "Basic Product Information." Note how each component fits together. Remove the pressure regulator, check the sealing ring sits correctly in the lid curl, and practice opening and closing the cooker several times.
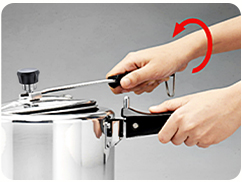
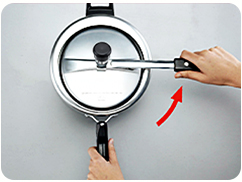
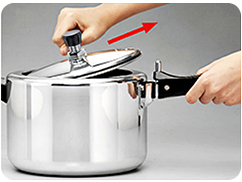
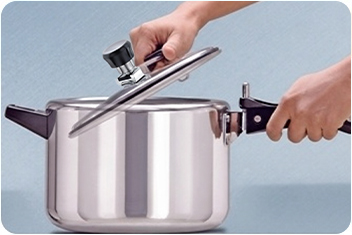
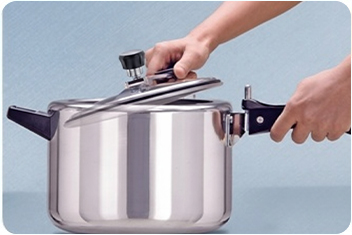
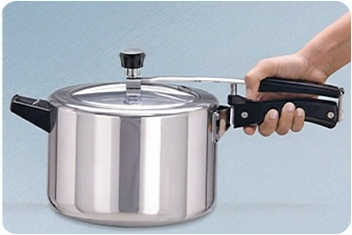
Opening & Closing the Cooker
Practice opening and closing the cooker several times before your first use. To open, hold the body handle firmly and swing the lid handle until it aligns with the body handle to release the lock, then lift the lid clear. To close, lower the lid into the body and rotate the handle back until it locks over the body handle.
Placing Cooker on Stove

Fill the cooker body with two cups of water. Add 1 teaspoon (5 ml) of lemon juice or vinegar (not for anodized cookers) to prevent discoloration. Remove the pressure regulator and ensure the steam vent is clear by looking through it.
Adjust the sealing ring in the lid curl by pressing it firmly into place. Close the cooker and place it on high heat.
Ensuring a Steam-tight Seal
When water begins to boil, steam should emerge ONLY from the steam vent. If steam escapes from the lid edges, adjust the lid by sliding it slightly toward the escape point and locking it again. The lid will be hot—DO NOT touch with bare hands.

WRONG: Steam coming out from lid edge

RIGHT: No steam leakage
Placing the Pressure Regulator


Once a steady flow of steam is coming from the vent, press the pressure regulator firmly downward onto the steam vent. Keep fingers away from the escaping steam—only touch the top of the regulator.
A soft "click" sound indicates that the regulator is properly seated. The cooker will reach full operating pressure in about two minutes.
How to Recognize Full Operating Pressure
When the regulator is placed, you will first hear a faint hissing sound. Once steam increases to maximum level, the regulator will begin to whistle. This indicates the cooker has reached full operating pressure. Reduce the heat and begin timing your recipe.

THE ONS COOKER WHISTLES AT FULL OPERATING PRESSURE
Maintaining Pressure on Reduced Heat
After full pressure is reached, reduce heat from HIGH to MEDIUM or lower. The cooker will maintain approximately 15 psi (1 kg/cm²).
If the cooker whistles more than four times per minute, reduce heat further. If no steam escapes for several minutes, increase heat slightly. Electric stoves may require small adjustments.
Releasing Pressure
Turn off the heat and remove the cooker from the burner.
ONS: Use a fork to gently lift the pressure regulator slightly to release steam. Do NOT remove the pressure regulator entirely.

Release pressure as required by the recipe or follow the guidelines in Easy Tips for Better Cooking.
Final Steps
Once pressure has fully released, open the cooker. Discard the water, rinse the pressure regulator, lid, and cooker body, and dry thoroughly. Store the cooker with the lid open to prevent odor buildup.
Before attempting real cooking, read the detailed instruction manual or cookbook included with your ONS Pressure Cooker.
Easy Tips for Better Cooking
Before using your ONS pressure cooker to prepare meals, read this section after completing the "Trial Run Before Cooking."
Size
Cooking time is determined by the size of each food item, not the total quantity. For even cooking, chop ingredients into uniform pieces.
Combining Foods
Foods requiring similar cooking times may be cooked together if kept physically separate, so flavors do not mix. Foods with different cooking times can be cooked together using these techniques:
- Shorten cooking time by cutting foods into smaller pieces and soaking beans, lentils, and grains beforehand.
- Lengthen cooking time by cutting foods into larger pieces and wrapping them in foil.
- Start cooking ingredients requiring more time, then pause the cooker, add quick-cooking items, and resume pressure cooking.
Adapting Your Own Recipes
Most moist-heat recipes (steaming, boiling, stews, braises) adapt well to pressure cooking. Refer to similar ONS recipes to estimate water quantities, food proportions, and cooking times.
If no similar recipe exists, cook under pressure for one-third of the usual time, check doneness, then continue cooking if needed.
Reduce liquid amounts because pressure cooking limits evaporation—ensure there is always enough liquid for the entire cooking duration.
Pressure cooking intensifies flavor, so season lightly and adjust after cooking.
Milk, cream, and yogurt may curdle when cooked under pressure; add them after pressure cooking unless recipe specifies otherwise.
Heat Source
ONS pressure cookers work on kerosene, gas, electric hot plates, and induction (for compatible models such as Stainless Steel and TRI-PLY).
Ensure the burner size matches the cooker base. Gas flames should not rise up the sides.
On wood or coal fires, keep the cooker at least 1 inch (2.5 cm) above direct coals. Do not expose the cooker to excessive heat as found on industrial burners (except Big PEXA models).
For legumes and foods that may sprout, cook on medium heat until full pressure is reached; then reduce the heat. If steam escapes forcefully, briefly remove the cooker from heat.
Frying Prior to Pressure Cooking
Some recipes require light frying before adding liquids. You may fry or brown ingredients in a small amount of fat directly in the cooker body without the lid.
Browning meat enhances flavor and seals in juices, but it is optional.
Brown food in small batches to maintain high oil temperature and ensure proper searing.
After frying, remove the cooker from heat before adding liquid.
Do not deep-fry in aluminum or anodized aluminum cookers (i.e., more than ½ cup oil or for more than 20 minutes). Stainless Steel & TRI-PLY ONS cookers allow longer deep-frying.
Pressure frying is never recommended—it requires oil-only cooking, and pressure cookers are designed for steam-based cooking.
Water
The pressure cooker must contain enough water (or other liquids such as stock, juices, vinegar, wine, or beer) to generate steam. Oils and fats do not produce steam.
Insufficient water may lead to burnt food, a blown safety valve, or cooker damage.
Minimum liquid requirement:
- For the first 10 minutes: 1 cup of liquid
- For each additional 10 minutes: ½ cup more (or proportional amount)
Reduce heat once full pressure is achieved to prevent boiling dry. Never use the pressure cooker as an oven for dry heating or baking.
Timing
Start timing only after the cooker reaches full pressure. Use a clock or timer—whistle counting is inaccurate.
Because pressure cooking is fast, timing mistakes may lead to undercooked or overcooked food.
If the food is slightly undercooked, you may finish cooking without pressure. For foods sensitive to overcooking, resume pressure cooking for a few more minutes.
Recipes provide approximate times. Adjust based on food age, softness, and preference.
A recipe specifying "Pressure Cooking Time 0 minute" means: Turn off the heat as soon as full pressure is reached.
Reducing Heat
Cooking on high heat after reaching full pressure does not cook food faster. It wastes fuel, increases risk of burning, and may damage the cooker.
On campfires or wood stoves, move the cooker to a cooler spot or adjust heat to maintain gentle steaming.
Releasing Pressure
There are three methods to release pressure:
- Allow to cool naturally: Turn off heat and let pressure drop on its own (10–20 minutes). Required for soups, dals, leavened dishes, and custards. Often improves flavor and tenderness (especially meats).
- Instant release by lifting pressure regulator slightly: Use a fork to lift the regulator just enough to release steam. Best for fish and delicate vegetables. Not suitable for liquid-heavy recipes (risk of liquid escaping).
- Cold water release: Place cooker in 4 inches (10 cm) of cold water. Open lid once pressure drops. Do not splash water onto the lid. Used when cooker has liquid or foaming foods that require immediate opening. Not recommended for 3L/5L Stainless Steel, TRI-PLY, or Induction Disc Base models.
Switching release methods changes cooking time:
- Instant → natural cooling: reduce cooking time by 2–3 minutes.
- Natural → instant opening: increase cooking time by 2–3 minutes.
Care & Cleaning
Follow these instructions to get the most out of your ONS Pressure Cooker.
Body and Lid
Prior to use, take off the label, clean, rinse, and dry the cooker. Use vegetable or baby oil to remove any glue. Never strike the cooker body's rim with a ladle, spoon, or other objects. Ensure that the lid's edge is free of dents that could affect sealing.
Never leave food or water inside the cooker for extended periods. Keep the cooker away from dirty dishes and water. Decomposing food and chemicals in water can cause pitting. Do not leave lemon juice, vinegar, mayonnaise, mustard, or salty liquids in the cooker. Never add salt without liquid inside.
Handles
Plastic handles may shatter if struck. The "play" or movement in the lid handle bar is intentional—do not attempt to remove or tighten it.
Rubber Sealing Ring / Gasket
The sealing ring may deform if stretched, especially when hot. Replace it when it cracks, hardens, or stops sealing. Before replacing, ensure the lid is correctly positioned and the ring is properly seated in the lid curl. Sometimes rotating or inverting the ring will stop a leak.
General Cleaning
The pressure cooker and its parts must never be washed in a dishwasher. (ONS Pexa and Mexa bodies may be washed in a dishwasher but may tarnish.)
Always clean and dry all surfaces immediately after use. Leaving food on the metal can cause corrosion. Wash all parts with hot water and mild soap. Rinse and dry thoroughly.
Remove the sealing ring when cleaning the lid. Wash gently without stretching it. Ensure the steam vent is clear—insert a thin wire if needed and rinse thoroughly.
Clean the perforations inside the pressure regulator using a water jet. The black spring may lose color over time; this does not affect performance.
Clean the area between the lid and lid handle bar with a brush as needed.
Hard anodized cooker bases may develop metallic marks from stove supports. Remove them using kitchen cleaner with an abrasive scrubber like Scotch-Brite or fine steel wool.
Baked-on Stains
If food or oil residue remains on the cooker and is reheated, it may become "baked-on" and difficult to remove. Clean the cooker base before placing it on a hot stove. Ensure the burner surface is free of fat drippings.
Soak the base in hot water. Apply a chlorine-based kitchen cleaner and let it sit for 5–10 minutes. Scrub using steel wool in circular motions. Rinse and dry.
For burnt food: Add enough water (not more than half full) to cover the stuck food. Close the lid and bring to full pressure. Cook 5 minutes on low heat. Allow natural cooling, then clean normally. Avoid bleach and harsh abrasive powders.
Loss of Shine
With frequent use, the aluminum body and lid may lose shine. This is natural and harmless.
Removing Stains Caused by Chemicals in Water
(Not applicable to TRI-PLY, Stainless Steel, or Hard Anodized Mexa & PEXA models.)
Mineral-rich water may darken the inside of the cooker. This does not affect food quality or safety.
To remove stains: Fill the cooker halfway with water. Add two tablespoons of lemon juice or tartaric acid per liter. Cook on high heat for 15 minutes with full pressure.
For stains on the upper part of the cooker body, simmer the same solution (without pressure) for 30 minutes. Wash and dry thoroughly.
Storing
Allow all parts to dry completely before storage. Keep the sealing ring in the lid curl and store the cooker open to prevent mustiness.
How to Prevent Unnecessary Fusing of the Safety Valve
- Ensure the steam vent is clear.
- Do not fill the cooker more than two-thirds (or half for liquids).
- Add adequate water for the cooking duration.
- Do not use the cooker on industrial burners (except Big PEXA models).
- Reduce heat once "Full Operating Pressure" is reached.
- Remove the cooker from heat after cooking time is completed.
Replaceable Parts
For safety and durability, always use original ONS spare parts.